For the past few years, my pet project has been Podtrificus Totalus, a Harry Potter podcast I host and produce with my boyfriend, Joe. Together, we read through a chapter from the books every week then dissect it in a (roughly) hour-long podcast. It’s a great way of merging my love for literature, my love for Joe, and, most importantly, my love of being a little technology goblin.
Naturally, I hang around in a lot of circles with other podcasters (or aspiring podcasters). By far my favorite is the Lady Pod Squad, a community of women podcasters who share promos, reviews, and general advice with one another. I’m also a regular lurker (and occasional poster) on /r/podcasting. In both places, I’ve shared scattered details about how I produce my own show, in hopes to save others from the agonizing research and trial and error I’ve put into establishing a workflow. With this post, I hope to provide an up to date, organized guide in the hopes that others can blend and borrow from my process to help improve or jump start their own. I am also open to critiques, too — I’m totally self-taught in all of this! I generally follow the guiding principle of “it sounds good, it is good,” but I don’t exactly have a trained ear or an intricate knowledge of why it sounds good. So if something is glaringly wrong, please do let me know in the comments!
Part One: Finding Your Niche
One of the silver linings of the quarantine has been that folks have found more time for their hobbies (or to discover new hobbies). That combined with our ongoing need for human connection and conversation I think has pushed many to pursue podcasting.
And that’s awesome! I love podcasting. I love the technological challenge of it. I love that it forces me to sit down and have (at least one) meaningful conversation a week. I love hearing the perspectives and ideas of the guests I’ve invited on my show. I do it for that love. I do it for fun. I don’t obsess over how many downloads we get in a week or how many five star reviews we have on Apple Podcasts. We haven’t made any effort to monetize the podcast, and I very much doubt we will. If you’re having fun doing it, that’s all that matters.
But one of the most frequent posts on communities like /r/podcasting comes from folks who are struggling to find an audience for their podcast. Most of the time, the podcast is a “just chatting” set up — a bunch of buddies recording their regular conversation, minimally editing it if at all, and releasing it out to the world. It’s a nightmare to market these types of shows out to more than your immediate social circle, if that. Jeff Bakalar commented on a recent episode of the Giant Beastcast — a favorite of mine — that a “just chatting” podcast is actually just a phone call. Which is fine! Again, if you’re having fun doing it, that’s all that matters. And this can be a good format to start with while you figure out your set up, then decide on a more specific direction. But I encourage anyone who wants to start a show to consider the following questions:
- What am I passionate about?
- Who is my audience? Who will this show interest and why?
- What authority do I have to speak on this subject? What makes me the person to deliver this message?
- Are there are other podcasts doing the same show or a similar one? How can I differentiate myself from them?
For Podtrificus Totalus, we started with a shared love for the Harry Potter series. I have listened to a lot of rewatch podcasts and read along podcasts, and so I wanted to emulate a similar structure for our show. So of course our audience would be Harry Potter fans, but we got more specific than that: we wanted to make sure that our show would be appropriate to listen to for the target of audience of the books. So we decided that we wouldn’t swear on the show or broach any inappropriate subject matter — or at least, nothing that is too far outside of the boundaries for the series. These boundaries will shift as we get further into the series and the characters age, but for now, we’re on a pretty strict PG rating. Moreover, we decided that some of our audience might be first-time readers, so we decided to only speak as far as the chapter we are reading goes — no spoilers.
Beyond the simple assumption that Harry Potter fans would want to listen to a podcast about the books, we also decided that part of the interest would be to hear a literary analysis of the books as well as learn behind the scenes information and trivia. So we often discuss theme, foreshadowing, setting, character development, etc., and we bring in outside content from interviews, Pottermore, fan theories, and so on.
As far as authority goes, this can be an interesting one. Many rewatch podcasts — Gilmore Guys, for example — use the structure of one superfan and one person who is new to the series. This wasn’t really an option for us, as both of us have read the series before. But we come from fairly different positions — I read the books obsessively as a kid, whereas Joe had watched the movies but only read the books for the first time in the last few years (under pressure by me). This is also my first time re-reading the series since I graduated high school, which is longer ago than I care to admit. That all said, we have authority as fans. I have some authority in that I have degrees in English, kind of (an English concentration for my Associate’s degree and a dual major in English and Education for my Bachelor’s). And we’re both teachers, so we care about the way literature is written for children.
Now of course, Harry Potter is (was?) a worldwide phenomenon, and there are likewise many podcasts about it — and many of them are read through podcasts. We entered a crowded field, but we were OK with that. We decided we could do our own spin on things from unique critical perspectives. And in some ways, this helped us. Before we recorded our first episode, we listened to a lot of other Harry Potter podcasts (and other rewatch podcasts) and chose things we’d like to adapt from them (like doing a quick chapter summary before going into a larger discussion) and things we wanted to do differently.
Part Two: Prepping for the Show
After going through those questions, you should have a decent sketch of what you want to do. Next, you need to figure out a format and do any research or prep work needed for your show. We keep to a general structure for ours:
- Welcome to the show
- Introduce hosts (and guest, if we have one)
- Chapter summary ( < 30 seconds, done on an alternating basis week by week)
- In-depth chapter analysis
- Spell of the Week (which has morphed into magical something of the week)
- Emails (if any)
- Outro (plugs, see you next week)
A lot of this might seem pretty intuitive or at least standard across all podcasts. But I think it’s important to listeners to know what to expect (and when). Some shows build out robust segments, like Gilmore Guys’s Pop Goes the Culture. Having a plan like this might also help you keep time and prevent your show from going on too long. By far, the meatiest part of our show is the chapter analysis, but if we’re still only midway through the chapter and we’ve been recording for 45 minutes, I know we have to hurry up because we need (roughly) another ten minutes for Spell of the Week, Emails, and the Outro, because we try to keep our show under an hour.
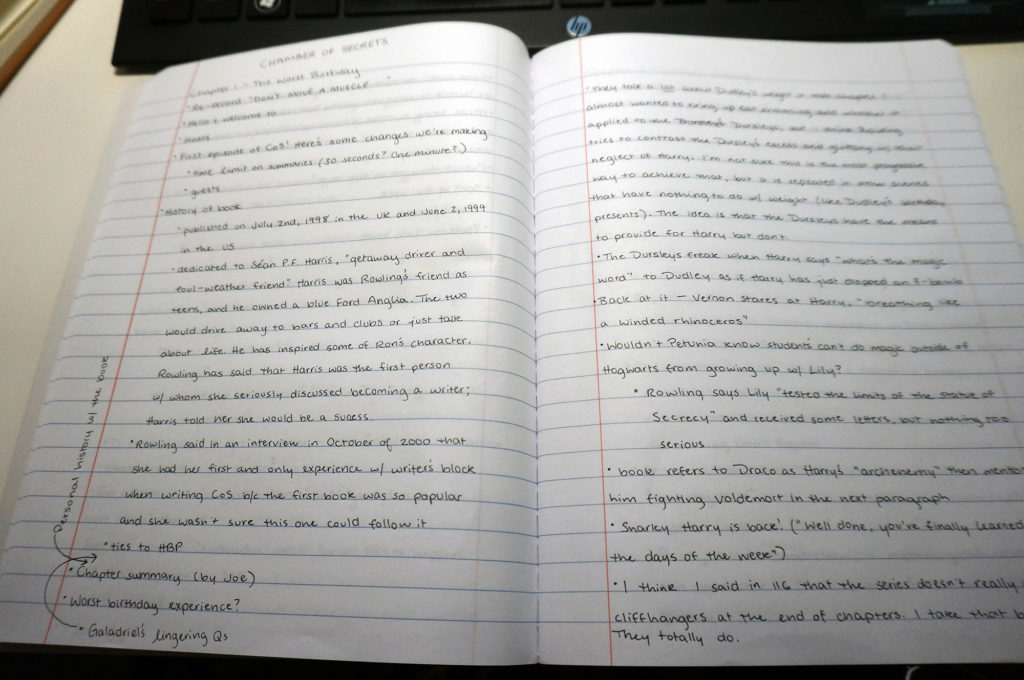
The level of research and prep you’ll have to do depends on your specific format. For an actual play podcast, your DM will have to do a lot of the heavy lifting, while the players might be able to just show up week to week. If you’re covering video game news, you’ll have to read through the major sites and pull the biggest and most interesting stories. For Podtrificus Totalus, we first have to both read the chapter. We do this separately, and we take separate notes. I do most of the heavy lifting for research, which means looking into interviews and etymologies and mythological references. I usually write this all down in a notebook (see below), but lately I’ve switched to OneNote to save my wrists a little.

Joe covers the Spell of the Week portion of the show. I make sure to save links to all the outside sources I consult so that I can credit them in the show notes. I like to think that this level of prep work focuses the show and ensures that I don’t have to do any major reorganization of the conversation when editing.
Part Three: Recording
Your recording set up is going to be largely dependent on your needs. It’s a lot more complicated (and expensive), for example, to record six people than it is to record two. I offer the following explanation as a guide for folks with similar needs to ours; I would also like to start with the disclaimer that we were trying to do things relatively cheaply without sacrificing too much in terms of flexibility and quality. Podcasting can be a big money sink, and for two (at the time) college students, we didn’t have that much to throw around. Wherever possible, I also tried to buy used gear or repurpose anything we already had around (namely, headphones and some random cables I’d hoarded over the years).
Our needs were:
- Two local hosts, always, in the same room (a second bedroom in our apartment). While we haven’t done so yet (and probably won’t for a while, given the quarantine), we also wanted the flexibility to invite a friend to come over and record with us, too.
- Occasional remote guest over Discord (or Skype or whatever)
- No plans to stream
- No plans to have a soundboard or outside audio piped in (aside from remote guest audio). Intro/outro music and sound effects will be added in post.
The Hardware
Because we planned to record multiple local hosts most of the time, I decided to go with an audio interface over a mixer. Mixers are great when you want to bring in lots of different audio sources or stream, but the ones within our budget are stereo mixers only — meaning we wouldn’t be able to record each microphone on its own track. That was a must have for me, because it gives you much more flexibility in editing. I had dabbled in podcasting before Podtrificus Totalus and worked with tracks that had multiple speakers. It is a nightmare to edit out coughs, table bumps, and cross-talk with everyone on one track, let alone balance audio levels.
The main brains of our setup is a Behringer UMC404HD. We started with a UMC202HD, which is very similar but has fewer inputs. I upgraded so that we could start having guests. My microphone goes into XLR Input 1 and Joe’s into XLR Input 2.
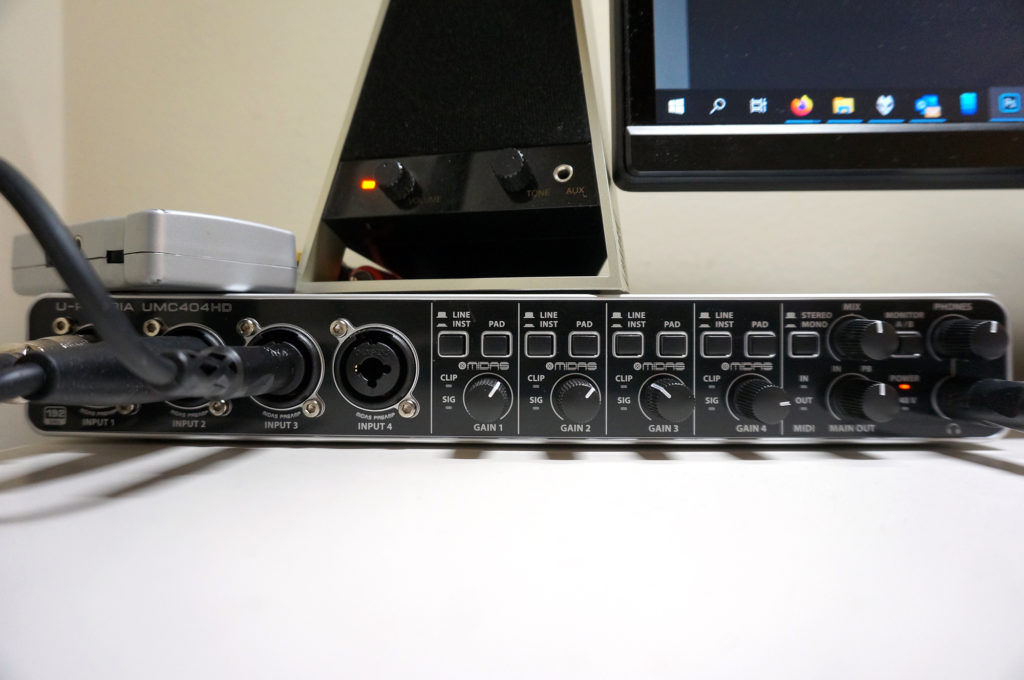
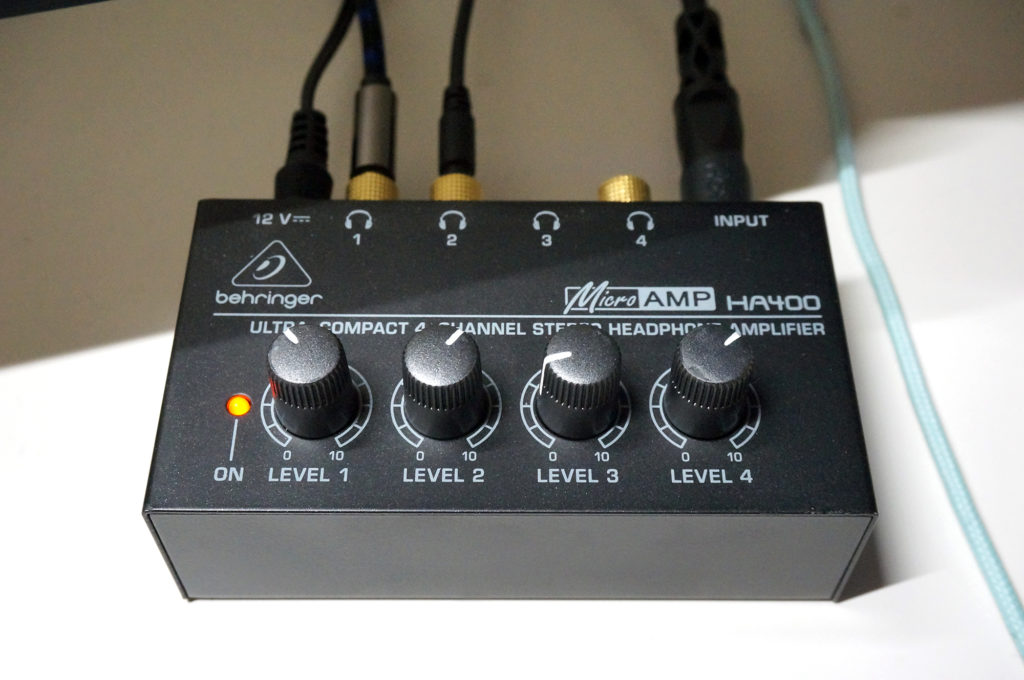
On the far right, you can see a headphone jack. Using a 1/4″ TRS cable, this feeds into a Behringer HA400, a four channel headphone amp. This allows both me and Joe to plug headphones into the amp and monitor audio while we record. Our remote guest audio also feeds into the UMC404HD, so we can hear that in our headphones too. We use 1/4″ to 3.5mm adapters in the outputs of the HA400 to allow the use of standard headphones. We also have 3.5mm male to female cables running out of them because the physical configuration of our room is kind of odd; these are by no means mandatory, but helps me route the cables around and keep them generally hidden. We don’t have any professional studio monitoring headphones; I use a HyperX headset that I use for gaming and Joe generally just uses earbuds. The HA400 also gives everyone their own volume control, which is nice because Joe listens to things at a normal volume and I blast it for my old, decaying eardrums.
Now, if you’re just recording the two local hosts, these are the two major devices you need (aside from microphones — more on that later). But we wanted the ability to have remote guests, too. This is complicated with the UMC 404HD, because cheap interfaces don’t feature built-in mix-minus functionality. ‘Mix-minus’ sounds like a fancy term, but really it just means this:
- The local hosts (me and Joe) need to be able to hear each other and our remote guest (the mix)
- Our remote guest needs to be able to hear me and Joe, not themselves (the mix minus their audio)
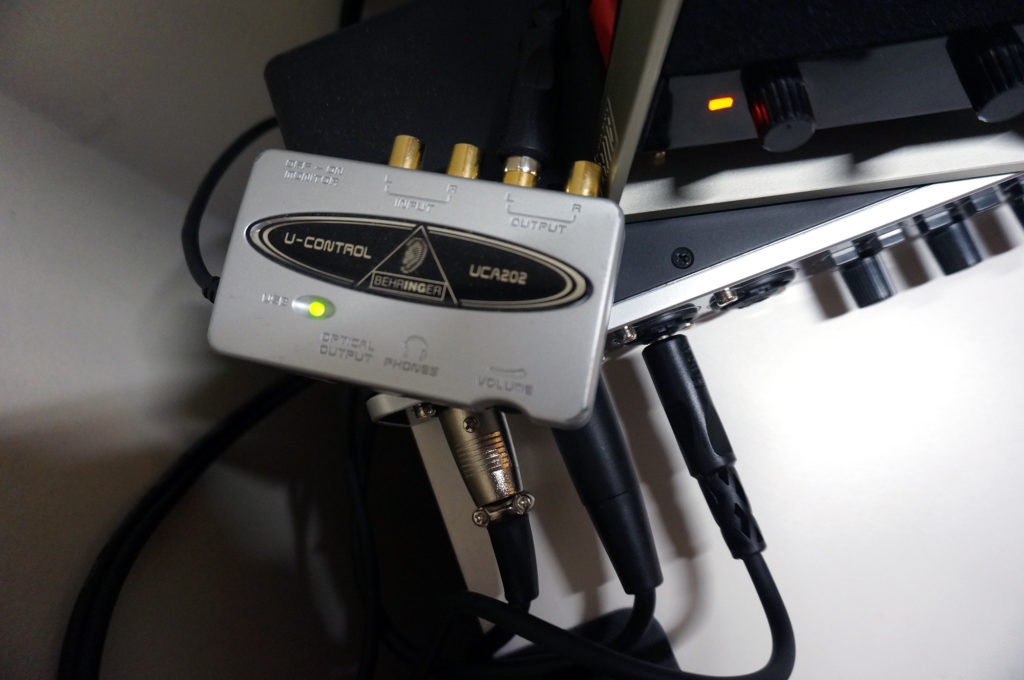
Enter the Behringer UCA202 (or UCA222 — from what I can tell, they are the exact same device, just in different colors). The UCA202 receives audio from Discord (and therefore, our guest). I use an RCA to to 1/4″ TS cable to route the audio from the UCA202 to Input 3 on the UMC404HD, which Joe and I can then monitor and which I can record in my DAW.
The minus of the mix-minus comes in with the way the UMC404HD drivers work. Most cheap interfaces will only surface Input 1 to an application like Discord or Skype. That’s a problem, because I need my guest to be able to hear Input 1 and 2. If that were the problem, I could theoretically take one of the outputs from the HA400 and send that to Discord, but then my guest would be hearing their audio sent back to them with a perceptible delay. But the UMC404HD can surface Jacks 1 and 2 or Jacks 3 and 4 to Discord, meaning my guest hears me (Jack 1), Joe (Jack 2), but not themselves on Jack 3.
Then, in my DAW (Reaper), I record Jacks 1, 2, and 3, for a synced conversation.
For microphones, Joe and I use two Samson Q2Us with foam windscreens. We originally started the podcast out with Behringer XM1800S microphones, which come in a three pack. I still keep those microphones around and will use them if we ever have a local guest — I just saw the Q2Us on sale for a good price a while back, and I like the flexibility of also having a USB port. I have to make a lot of videos for grad school and Joe makes videos for his students, so it’s convenient to be able to just plug them into our computers via USB and work with them that way.
Hardware Cost Breakdown
This breakdown assumes you can get the gear for their typical MSRP; the quarantine has driven up the cost of basically all tech, so prices may vary. For the cables, I have estimated a rough price. You may be able to find them cheaper. I also have not included headphones here; you probably have some laying around that will work just fine for now.
- Behringer UMC404HD ($180)
- Behringer HA400 ($25)
- 1/4″ TRS cable to connect UMC404HD to HA400 (~$10)
- Behringer UCA202 ($30)
- RCA to 1/4″ TS cable to connect UCA202 to UMC404HD (~$10)
- Behringer XM1800S three pack ($45)
- XLR cables ($10 x 2 = $20)
- Mic stands ($20 x 2 = $40)
- Foam windscreens ($5 for a pack of five)
- 1/4″ to 3.5mm adapters ($5 for a four pack)
- Total Cost (not including tax and shipping): $370
The Samson Q2Us cost $60/each at regular price (again, I got mine on sale), which would bring your total cost up to $445.
Remote Recording & Redundancy
Now again, you could definitely just leaves things there and proceed on to the next stage of this post. But if you’ve ever used Discord — particularly with someone with a spotty internet connection — you might notice that words get cut off at the end of sentences or audio otherwise gets distorted. This isn’t necessarily Discord’s fault — that’s just what happens when you’re sending audio over the internet in a lossy format. But my guests so far have all been fellow podcasters with decent microphones of their own. The ideal situation is having them record their audio locally, then send it over to me to use in the final edit because that won’t be subject to Discord’s processing and compression. But I don’t like putting that on my guest, both because it’s a burden and it’s prone to failure.
My solution is to use the Discord bot Craig with the Ennuicastr add-on. Basically, Craig joins the voice channel with me and my guests and records the audio he receives from each speaker in Discord (so me and Joe on one track and my guest on another). This is great, because it’s a backup recording in case, for some reason, Reaper fails me (it hasn’t yet, but I like to be careful — imagine having an important guest on and having to ask them to re-record because you lost their audio). But this audio is still subject to the distortion I mentioned before, which is where Ennuicastr comes in. When you start a recording with Craig, the bot also sends out an Ennuicastr client link if Ennuicastr is enabled. I send that link over to my guest, who opens it in their browser. Ennuicastr then creates a local recording from the guest’s microphone and automatically sends it to me once we’re done — and that audio doesn’t have any of the Discord distortion. It’s equivalent to them having recorded it on their own — and best of all, it’s totally free for me to use.
Note: At the time of writing this, the creator of Craig has another service in beta, Ecastr, which is a version of Ennuicastr that is totally independent of Discord. The audio during the call is generally superior because there is much less processing and compression happening. I prefer it and have used it with a guest, but the process and set up for it is near identical. I may revise this post in the future with an update once the service leaves beta.
So when all is said and done, I have three recordings:
- Audio from the UMC404HD: direct mic recordings from me and Joe, Discord audio from guest
- Audio from Craig: Discord audio of me and Joe on one track, Discord audio from guest
- Audio from Ennuicastr: me and Joe on one track, direct mic recording of the guest
When I edit, I keep the direct microphone recordings for me and Joe and use the Ennuicastr audio for me guest. I keep the Discord audio I recorded of the guest in #1 for synchronization purposes, but keep it muted and ultimately delete it before exporting the final project. You can hear a recent episode of the podcast that featured a guest here.
Part Four: Editing
Alright, so you have your plan for your show and you’ve put it into action. You’ve got a great raw recording to work from. Now it’s time to edit.
Editing is by far the most time consuming part of my process. It’s been a while since I timed myself, but an hour long episode can easily take two or three hours to edit depending on if I have to do any audio repair (like if Joe played with his microphone stand the whole time) or if the conversation meandered. Many podcasters edit with their audio played at higher playback rates (like 1.5x speed). I haven’t gotten there yet, but I hope to.
I do all of my recording and editing in Reaper, which is a digital audio workstation with an incredibly generous, fully functional free trial that never expires. I do use many paid plugins; where possible, I’ll suggest possible alternatives you could potentially use instead of them. I learned and adapted much of my editing workflow from Podigy’s own awesome tutorial. They have a much more in-depth explanation of things like what each setting in a VST does and why, so I definitely recommend it as a companion to my walkthrough here.
This is what a project typically looks like before I start editing (though much longer — this was a test recording). If needed, I’ll sync the audio from Ennuicastr up with my recordings, then use that track instead of the Input 3 track.
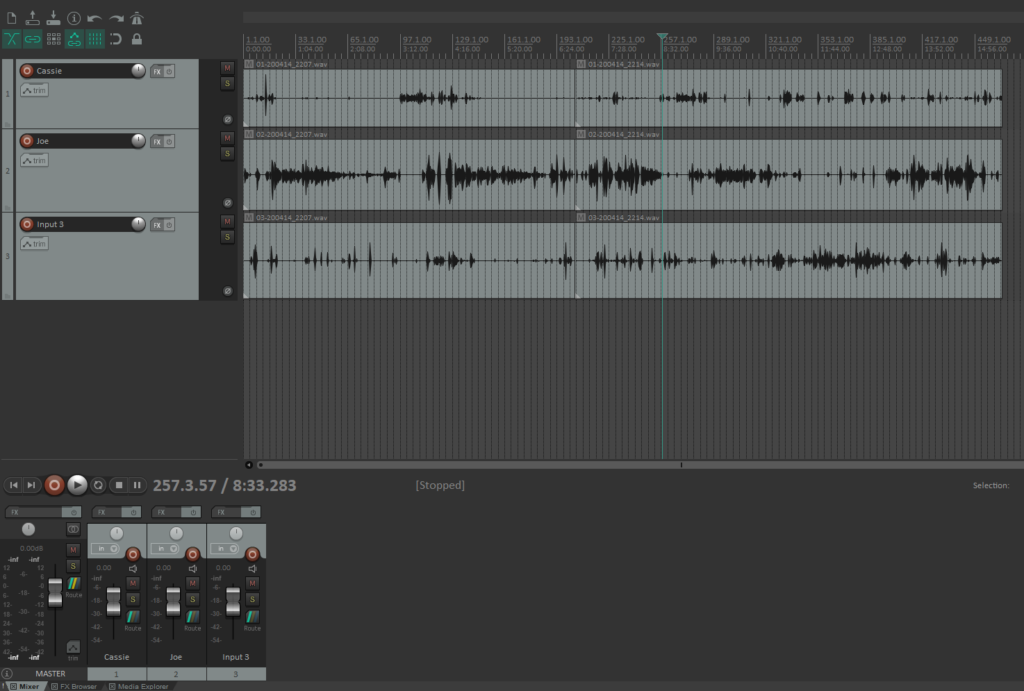
I use Reaper’s ripple editing functionality to make it easier to edit multiple tracks at once without falling out of sync, so start by toggling that on for all tracks using the button at the top left (it’s turned off in the screenshot above).
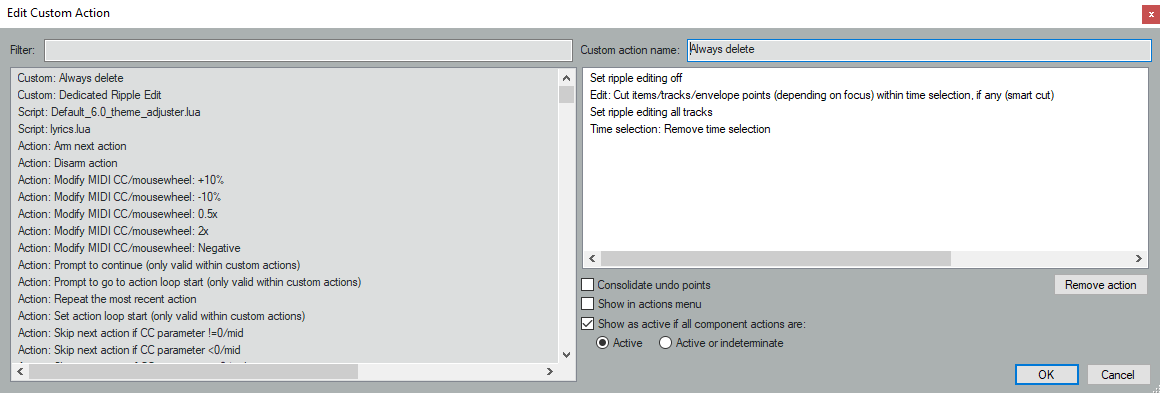
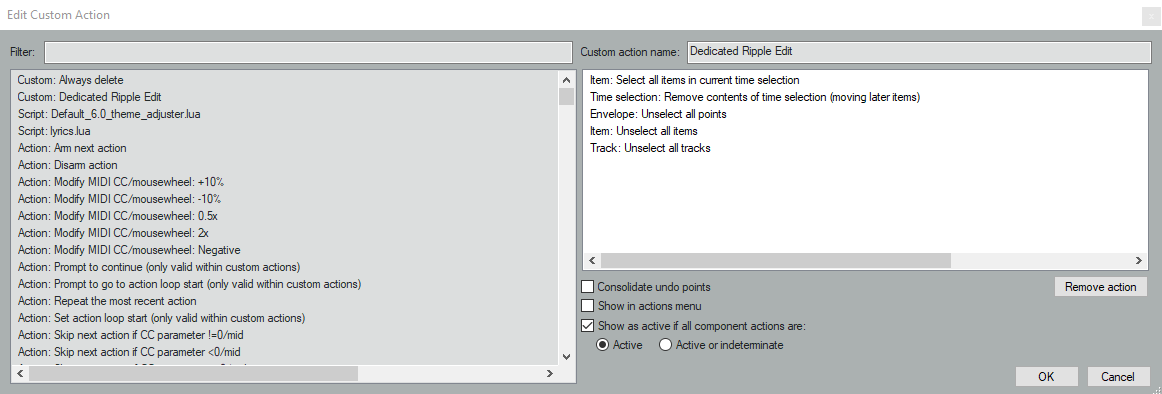
I’ve adapted some shortcut keys from Podigy to speed up this process even more (Actions > Show actions list). The first is mapped to the Z key, and it performs the following actions:
- Set ripple editing off
- Edit: Cut items/tracks/envelope points (depending on focus) within time selection, if any (smart cut)
- Set ripple editing all tracks
- Time selection: Remove time selection
I use this track to outright delete everything on all three tracks. So if we go off on a tangent that doesn’t add anything to the episode, I highlight it all within a time selection, hit Z, and it’s gone.
The next shortcut key is mapped to X. It performs the following:
- Item: Select all items in current time selection
- Time selection: Remove contents of time selection (moving later items)
- Envelope: Unselect all points
- Item: Unselect all items
- Track: Unselect all tracks
I use this shortcut to remove crosstalk or otherwise unwanted sounds — so if Joe coughs while I’m talking, I highlight the cough, select the item on his track, then hit X. This removes his audio (the cough) while preserving mine.
FX Chains
With those shortcut keys now set up, let’s move onto the FX chains that I use. Do note that this is what I have found personally works well for our voices and sounds good to me; I’m always tweaking and adjusting, and these settings may not necessarily work for you.
Individual Tracks
The following FX chain is applied to the individual tracks for each speaker. Here’s the full list; I’ll break each one down and explain what it does in-depth.
- RX7 Voice De-noise
- RX7 De-plosive
- RX7 Mouth De-click
- L1 limiter Mono (Waves)
- ReaComp
- DeBreath Mono (Waves)
- RX7 De-ess
- ReaEQ
As you can see, I use multiple plugins from iZotope RX7. It’s pricey, but you can often find good deals — usually I discover them through /r/podcasting. At the time of writing this, for example, iZotope is currently selling the Elements versions of their plugins bundled for $49, and you can always upgrade to Standard to get the additional plugins from there through their loyalty pricing. But there are free alternatives out there that I’m sure can net you very similar results. iZotope RX and the Waves plugins I use are just very easy to use and have great presets to work from. If you don’t have these plugins, that’s okay! A lot of them just automate clean up that can be done manually. The most important parts of the process — the Compression and EQ — are free plugins bundled with Reaper.
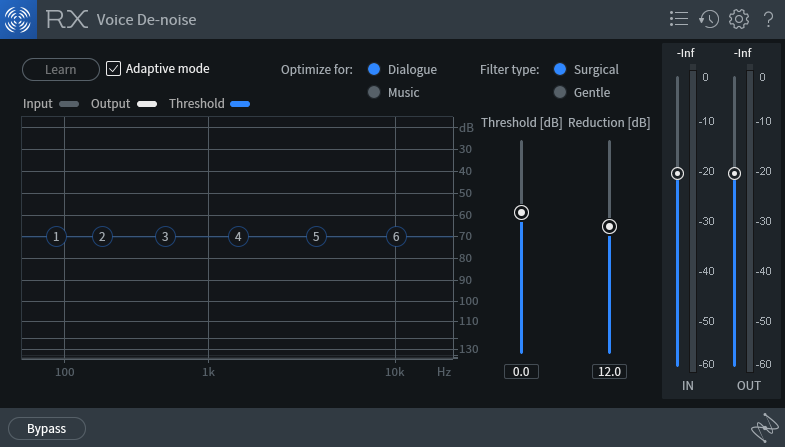
RX7 Voice De-Noise
The recordings I get from our microphones are generally pretty clean — the room is fairly quiet and we don’t run any fans or air conditioners that create noise. Still, it’s worth it to me to run de-noising to ensure a clean signal. I use RX Voice De-noise in Adaptive mode, which means it constantly adjusts the noise gate for you. It works well. You could easily use a plugin like ReaFir (free with Reaper) to build a noise profile that is then removed. Podigy covers this in their audio cleanup tutorial.
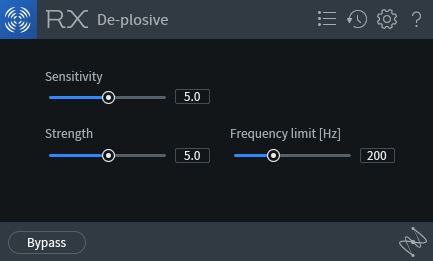
RX 7 De-plosive
Plosives are the popping sound that is produced when we say letters like p and b. This plugin is great at minimizing them with minimal impact to the rest of the audio. Again, Podigy’s audio cleanup has a tutorial on how you can remove these using just the FX provided with Reaper, but it’s a manual process. I prefer having something that I can set and then forget, which RX7 provides. You can adjust the sliders for your individual voice, but I find the defaults work quite well.
RX7 Mouth De-click
Mouth clicks and lip smacks can really turn off listeners; while they can be partly solved with good mic technique and staying hydrating, we’re no pros. So Mouth De-click saves my butt regularly. Again, these are probably the default settings.
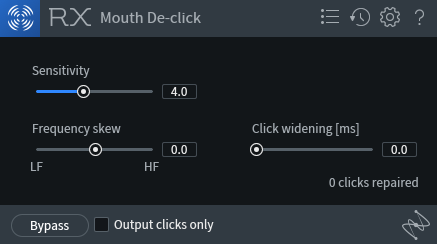
If you ever want to check if the plugin is working (or just hear something truly disgusting), check Output clicks only and play some audio. You’ll understand why this is so important.
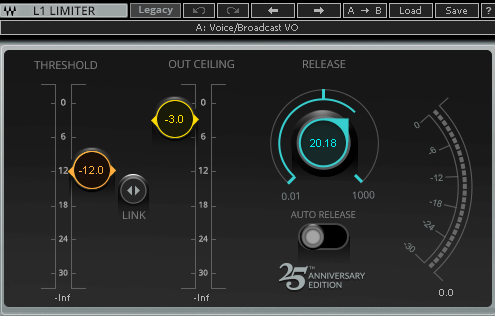
L1 Limiter Mono (Waves)
You might have noticed that I record my tracks pretty quiet. This is to prevent clipping, that is, the audio signal bottoming out with excited speech. This limit basically boosts up the signal to a set threshold without passing it. I’m sure you could achieve a similar effect with the Master Limiter provided with Reaper. I find this helps me get a consistent maximum loudness before moving into compression; it’s basically my way of normalizing the tracks.
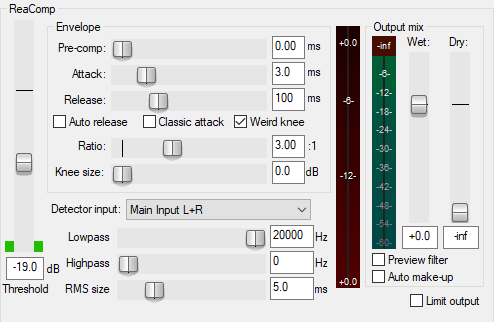
ReaComp
This is by far the most important step. Most of what we’ve done so far is just cleaning up some imperfections in the audio. ReaComp is a compressor that helps balance out the audio levels. It takes the quiet parts of the signal and boosts them up (like if you whisper or move away from the microphone) and crushes down loud parts of the signal (like if you’re yelling). This makes for a much smoother experience for the listener; they don’t have to worry about blowing out their eardrums just because I got really excited talking about Molly Weasley.
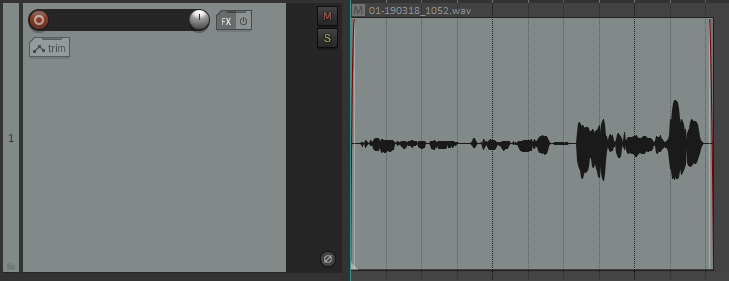
As an example, let’s look at this piece of audio. You’ll notice that the signal in the beginning is pretty quiet, but then it gets louder toward the end. Uncompressed, it looks and sounds like this:
Compressing the signal smushes that waveform together for a more consistent level. Here’s what the compressed audio might look like.
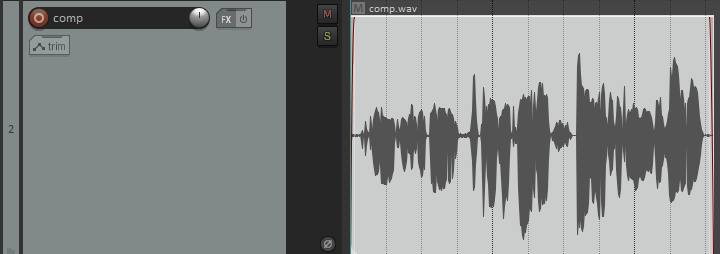
Notice that the waveform is now a lot more consistent. There’s still a loud portion of the audio and a quiet portion — there’s still dynamic range — but it’s much less jarring.
Here are the settings I use for ReaComp. Note that I do compress later on in the Master track — this is lighter compression to balance out differences in volume for that specific speaker; differences in my volume versus my co-host’s are compressed on the Master.
De-Breath Mono (Waves)
This is less of an issue for Joe than me, but I tend to sharply intake after I laugh, which can be unpleasant to listen to. Breaths in general are usually pretty quiet, but now that we’ve amplified the quiet parts of our audio with the compressor, they’re now a lot more prominent. You can manually edit around them, but this can be tedious, and removing them altogether can leave the recordings sounding a little unnatural. Waves De-Breath does a good job of reducing the volume of the breaths without removing them outright.
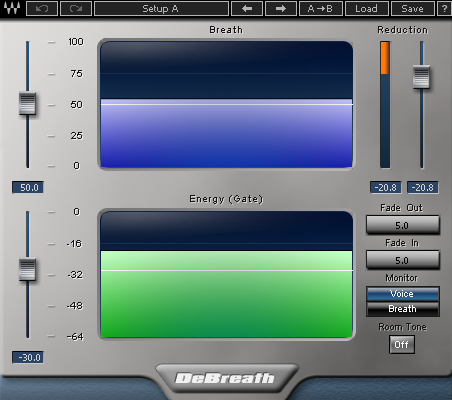
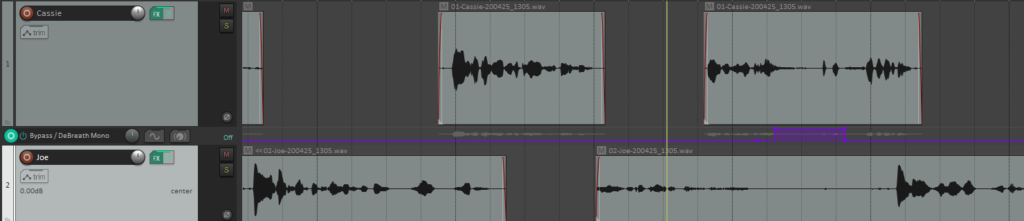
Waves De-Breath, for all the good it does, can be a little ham-handed, however, in that it picks up some sounds that aren’t just breaths. Noises like the ch sound in words get picked up and crushed down by De-Breath, so I create a bypass for the plugin; when I’m editing and notice that it’s happening, I basically tell Reaper to bypass the plugin for that specific portion of audio, then turn back on when I tell it. You do this by clicking the Param button, and choosing FX Parameter List > Show track envelope > Bypass. This will add a little purple line beneath your track. You can then create envelope points to bypass the plugin as necessary.
You can do this for just about any plugin in the workflow. I’ve only found it’s necessary for the De-Breath plugin, but if a plugin is cutting into your audio in a way you don’t like, consider keeping it bypassed until you need it (like bypassing a de-plosive plugin and only enabling it when you say popcorn).
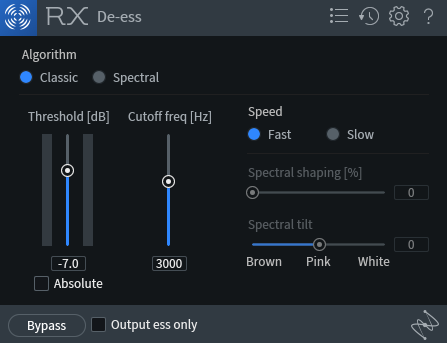
RX7 De-Ess
A de-esser kicks down sibilant noises, or the hissing sound produced when we pronounce s sounds. If you don’t have RX7, Spitfish is a great free alternative.
ReaEQ
Equalization allows you to boost the frequencies you want in your audio while reducing the ones that you don’t. This is where I’m still experimenting a lot. I’ve adapted this EQ curve from this video tutorial, but it’s always changing according to my speaker or what kind of sound I’m trying to achieve.
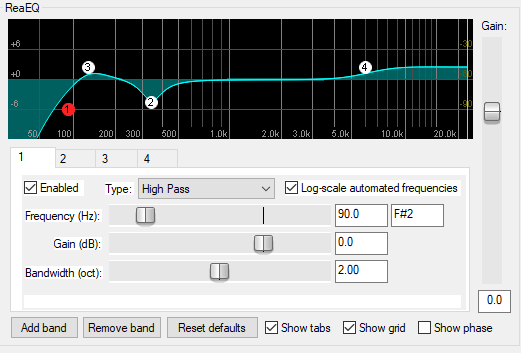
- Band 1: High Pass at 90 Hz; 0 dB Gain reduction; Bandwidth of 2.00
- Band 2: Band at 340 Hz; -4.5 dB Gain reduction; Bandwidth of 0.57
- Band 3: Band at 130 Hz; 2.5 dB Gain boost; Bandwidth of 1.20
- Band 4: High Shelf at 6000 Hz; 2.5 dB Gain boost; Bandwidth of 0.67
Master Track
Okay, so our individual tracks are sounding nice and with some light compression. Now we’re going to compress even further to unify the sound across all the tracks and do some loudness targeting. Because this is a podcast and we’re outputting a mono signal, we’re going to target -19.0 LUFS. Here’s what the chain looks like:
- ReaXcomp
- Trileveler 2
- Master Limiter
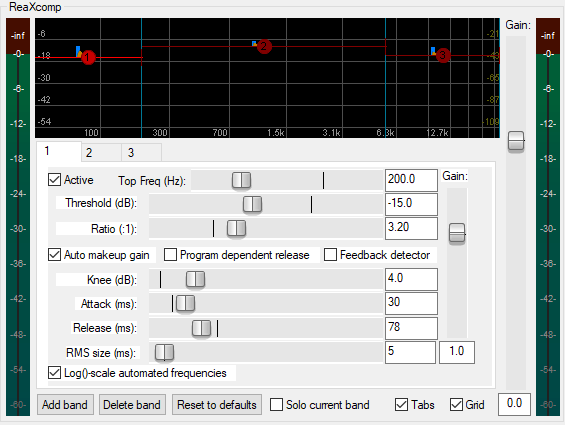
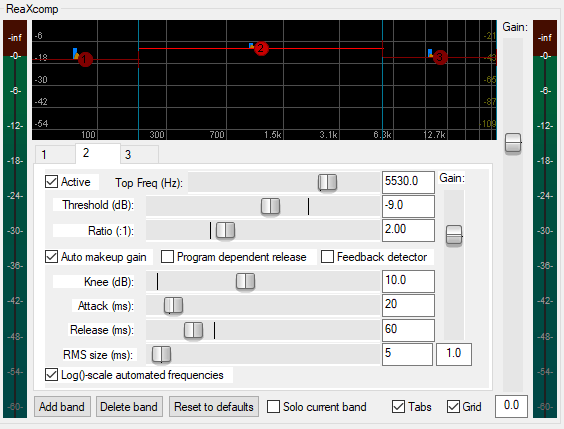
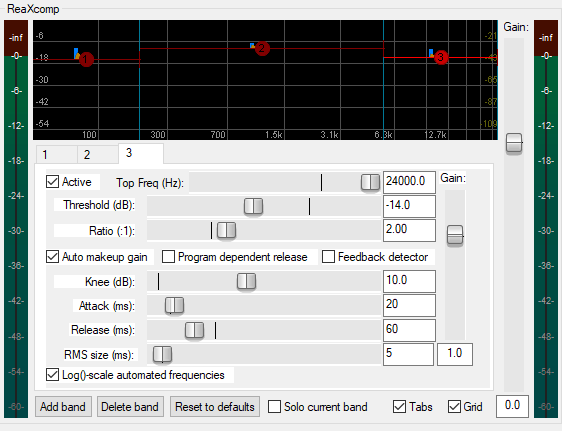
ReaXcomp
This time we’re going to use a multi-band compressor, but the goal is basically the same as when we compressed the individual tracks.
TriLeveler 2
Next, we’re going to use an awesome free plugin by Sonic Anomaly to do some loudness targeting. This is basically another compressor, but it allows us to set a target loudness (in LUFS) and it will boost or reduce our audio as necessary to hit that.
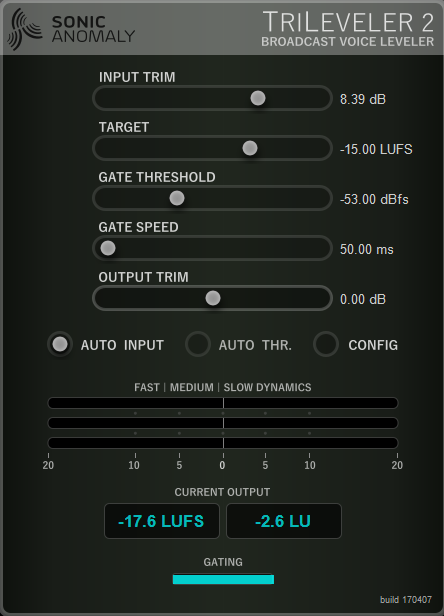
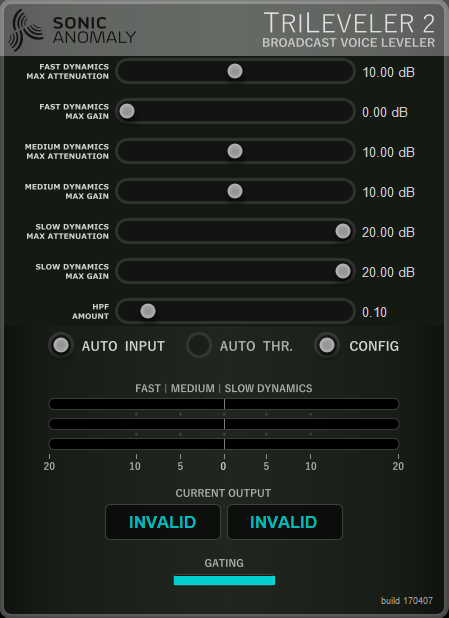
Now, you might be wondering why we didn’t set the target loudness to -19 LUFS. We’re going to add a final limiter that I’ve configured to get us exactly there using what the Trileveler spits out.
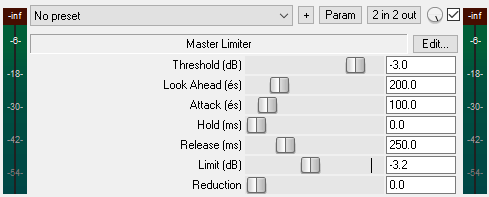
Master Limiter
This limiter basically forbids our signal from passing -3.0 dB and produces a final -19.0 LUFS mono file. Easy, and no need for expensive tools like Auphonic!
Exporting
Now that we have our FX chains set and we’ve edited our conversation, it’s time to export. I use a mono MP3 at 96kbps, which keeps file sizes small without compromising on quality (for spoken words — music at 96kbps will sound bad).
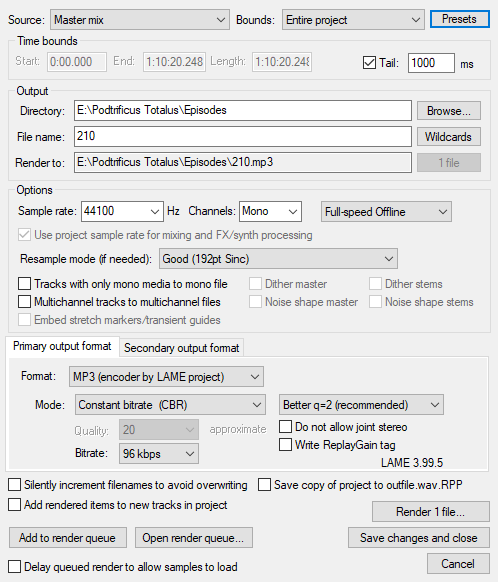
Finally, I use foobar2000, my music player of choice, to write ID3 tags to the file and attach cover art.
Part Five: Uploading
Alright, we have our finished episode and we’re ready to get it out to the world. This part will rely mostly on your comfort level with web hosting; for most folks, services like Libsyn or Blubrry will take care of hosting your media and even establishing a website for you. I personally have a self-hosted WordPress site for my podcast; I use the Blubrry plugin PowerPress to generate an Apple Podcasts-friendly feed, a custom theme that I created with a little help from a buddy, and the Podigee Podcast Player. I host my media files on Digital Ocean Spaces. This amounts to $10/mo ($5 Digital Ocean droplet + $5 for Spaces) for a set up with none of the artificial restrictions that hosting services impose and that I’m always in full control of. I am considering moving from Spaces to Backblaze behind Cloudfront to prevent any surprise bandwidth overages, but for now, Spaces works for me.
And that’s it! Please do let me know how this guide helped you out and if you’ve made any tweaks that have improved your sound. Happy podcasting!
Leave a Reply to How We Do It: Self-Hosting a Podcast with Podtrificus Totalus – banshee beat Cancel reply